DISH
Tutorials
DISH mobile app
A walkthrough of the DISH mobile app
DISH App - How to manage team members in the app
How do I access my tools' dashboard through my mobile device?
How do I change my password in the DISH mobile app?
How do I edit my account information in the DISH mobile app?
How do I set up a pin number for my DISH app ?
Visit my dashboard in the DISH mobile app
Bank transfer payment in Coatia 🇭🇷
Bank transfer payment in Hungary 🇭🇺
How do I access the blog on dish.co?
How do I add a new team member?
How do I cancel my DISH subscription?
How do I change my password on dish.co?
How do I change my payment details?
How do I contact the support via WhatsApp?
How do I create a DISH account?
How do I create flyers and QR labels?
How do I downgrade my subscription?
How do I edit information of my establishment?
How do I upgrade to DISH Premium?
How do I view my DISH Product invoices?
How to edit information on my account?
How to edit my notification settings?
FAQs
Customer Support
DISH POS
First steps with DISH POS
DISH POS Onboarding
Receiving your DISH POS shipment
What should I know about my DISH POS Hardware Warranty?
What should I know about storing my hardware?
🔒 Introduction and most important functions of your DISH POS
Backoffice
Articles
How do I add a fixed-price menu?
How do I add a new product group?
How do I add a product and assign it to a menu?
How do I add and assign a packaging profile?
How do I add and manage derived menus?
How do I add and manage price levels?
How do I add and manage price sets?
How do I add and manage promotions on DISH POS?
How do I add time restrictions to my menus?
How do I adjust product details in the list view?
How do I adjust product details?
How do I assign allergens and additives to a product?
How do I assign menus for specific areas and times?
How do I assign price levels to my store?
How do I assign sales and restrictions to products and product groups?
How do I create composites of multiple articles?
How do I find products with the search and filter function?
How do I manage and add products?
How do I manage and arrange menus (incl. sub-menus)?
How do I set up a production order?
How to add a menu with multiple options?
Finance
How do I export a shift report?
How do I generate and export turnover reports?
How do I retrieve a shift report?
How do I retrieve orders in the back office?
Updated Z-report DISH POS
General
User groups
How can I add and manage a printer?
How can I add and manage table maps?
How can I add and manage users?
How do I add and manage a user group?
How do I add and manage cash stores?
How do I add and manage courses?
How do I add and manage currencies?
How do I add and manage customers?
How do I add and manage fixed discounts for my stores?
How do I add and manage production stations?
How do I add and manage turnover categories?
How do I add or manage areas and facilities? (e.g. tables)
How do I adjust the production ticket layout?
How do I create a NATIVE gift card?
How do I create app links for my POS devices?
How do I have a payment QR code printed by default?
How do I implement Takeaway in Germany?
How do I link DISH Reservation to my POS devices?
How do I manage my POS device?
How do I send changes from the Backoffice to my POS?
How do I set up a buzzer/zoomer?
How do I set up different permissions for users on DISH POS?
How do I set up multiple languages for facilities?
How do I translate menu items?
How to display the lottery function and adjust its position within the app? - Italy only 🇮🇹
Payment
How do I add a Pagamento non riscosso? 🇮🇹
How do I add and manage payment methods (incl. payment menus)?
How do I manage EFT devices?
Setting Up a Stand-Alone EFT Terminal 🇩🇪
Self-service
QR codes
Adjusting the appearance of the self service QR shop
How can I change settings for DISH Payment?
How can I configure random spot checks on my self-service POS/Grab and Go POS?
How do I activate the Pay on pick up functionality?
How do I add and manage time schedules for the self-service?
How do I adjust and personalise my webshop?
How do I adjust the appearance of the kiosk?
How do I create QR codes for the self-service?
How do I link two different menus in the Kiosk based on Eat-In or Takeaway?
How do I reorder via a QR code on the table? (Customer perspective)
How do I set up the imprint for web shops and QR sales channels?
DISH POS BI
How can I disable automated ticket printing?
How do I change my password?
How to access the Backoffice?
Overview of the dashboard on the backoffice
App
Installation
How can I download the new POS App?
How do I connect the DISH POS app to my system?
How do I update my DISH POS app?
App-functions
How can I register cash transactions for the cash book? (Kassenbuch)
How do I access the set-up web links on my device?
How do I adjust the stock information of a product?
How do I close the shifts on my device?
How do I disable ticket printing from my device?
How do I enter tip when cashing out?
How do I print reports from my device?
How do I reopen orders?
How do I search for an order on my device?
How do I select a facility on my device?
How do I select an EFT device on my device?
Working with the app
An overview of the general functions for an open table
An overview of the screen features for an open table
How can I activate the Digital Receipt?
How can I get the Factura Simplificada? (Spain only 🇪🇸)
How can I let the customer pay via a QR code?
How can I manage tables in the block view?
How can I open a table?
How can I retrieve payments that could not be linked to an order?
How can I send my customer a digital receipt?
How can I split or move a table?
How do I open and close a self-service on my device?
How do I print a receipt in a different language? - Spain only 🇪🇸
How do I activate my Giftcard? (only for 🇳🇱)
How do I add or remove recycling deposits of a table?
How do I adjust a product in the ordering process?
How do I cancel orders and enter a reason for it? (Germany only 🇩🇪)
How do I cash out a table?
How do I check the current balance of a gift card?
How do I fill out and save the Factura Completa? (Spain only 🇪🇸)
How do I fill out and save the Fattura Elettronica? (only for 🇮🇹)
How do I issue a gift card? (only for 🇩🇪)
How do I link payment methods in Omniboost? (only for 🇳🇱)
How do I manage tables on my device?
How do I map of payment methods in Combidesk? (only for 🇳🇱)
How do I move orders from tables on the table map?
How do I print hospitality receipts?
How do I redeem a native gift card?
How do I select a fixed-price menus for an order?
How do I set up flexible payment during a visit?
How do I use the lottery ticket feature? - Italy only 🇮🇹
How to log in and out of the DISH POS App?
How to manage customer accounts in the App?
New POS App - How can I split or move a table?
Settings
How can I manage the hardware settings for my device?
How do I adjust the connection settings for my device?
How do I adjust the view of the facilities screen for my device?
How do I adjust the view of the menu and order screen on my device?
How do I adjust the view of the payment screen on my device?
How do I adjust the view of the stock overview on my device?
How do I change the display orientation on my device?
How do I change the input mode on my device?
How do I manage log in and log out settings for my device?
FAQs
DISH POS Insights App
How do I install the DISH POS Insights App?
How do I retrieve reports from the DISH POS Insights App?
How to count my drawer on DISH POS Insights App?
Turnover Dashboard on DISH POS Insights
POS Troubleshooting Hub
Cash Drawer: common issues and troubleshooting
DISH POS Handheld: common issues and troubleshooting
DISH POS Printer (Epson): common issues and troubleshooting
DISH POS Screen: common issues and troubleshooting
What to do in case of hardware related issues ?
How to change the delivery options with UPS?
🔒 DISH POS Hardware Warranty Scope
Instapkassa
FAQs
Backoffice
Articles
Adding a new product group
Adding and managing turnover groups
Adjusting product details
How can I assign allergens and additives to a product?
How do I can and assign a packaging profile?
Manage and adding products
Managing and arranging menus (incl. sub-menus)
General
Adding a product and assigning it to a menu
Adding and managing user groups
Functions of the dashboard
How do I add and manage users?
Finance
POS
General
Adjusting product functions
Adjusting the facilities view
An overview of the general functions for an open table
Opening tables
Reopening orders
Payment
Sales
Downloads
DISH Pay
DISH Pay Now
Welcome to DISH Pay Now
0. Welcome to DISH Pay Now
1. Activate your account
2. Complete device onboarding
3. Start processing transactions
DISH Pay Now Datasheet
FAQ - DISH Pay Now
General / How to use
DISH Pay Now - How can I activate DISH Pay Launcher?
DISH Pay Now - How can I fix login issues I might encounter with the DISH Pay app?
DISH Pay Now - How do I access my transactions list in the DISH Pay app?
DISH Pay Now - How do I create my own Google account for DISH Pay Now?
DISH Pay Now - How do I log in to the DISH Pay app and do my first transaction?
DISH Pay Now - How do I provide a digital receipt with my DISH Pay app?
DISH Pay Now - How do I send a refund from the DISH Pay app?
Tap to Pay
How can I fix login issues I might encounter with the DISH Pay app?
How do I access my transactions list in the DISH Pay app?
How do I provide a digital receipt with my DISH Pay app?
How do I send a refund from the DISH Pay app?
Self-Installation guide for Tap to Pay with Motorola G14
Tap to Pay Terminal - Motorola G14
S1F2
V400m
V400c Plus
DISH Pay - V400c Plus - Data sheet
V400c Plus - Self-Installation User Manual
V400c Plus - Standard User Manual
P400 Plus
FAQs
General Information & Documents
Unreferenced refund activation request
DISH Order
First steps with DISH Order
Tutorials
General / How to start
Dashboard
An overview of the dashboard
How can I adjust the settings of a restaurants location?
How do I accept an order on the Dashboard ?
How do I auto deactivate the webshop?
How do I cancel an order with reasoning in the Dashboard?
How do I define additional fees for a payment method?
How do I download customer's data?
How do I edit legal information of the restaurant?
How do I edit my location?
How do I enable the reusable food container option?
How do I integrate PayPal as a payment method?
How do I integrate online payment methods?
How do I manage my orders without using the order terminal?
How do I manage my orders?
How do I manage the data of a registered customer?
How do I set up and change menu categories?
How do I set up and change menu items?
How do I set up coupons in my webshop?
How do I set up delivery areas of a restaurants location?
How do I set up options and allergens into my webshop?
How do I set up special prices to menu items?
How to add a discount to a menu item?
How to add allergenes & additivies to a menu item?
How to adjust opening hours of a restaurants location?
How to set up mealtimes?
Order Terminal
How to add a new device/order terminal?
How to cancel an order with reasoning?
How to connect my webshop to my website?
How to display account & contact information?
How to log in to the order terminal?
How to manage orders via the terminal?
Terminal - How to adjust my opening hours?
Terminal - How to disconnect the restaurant account on the app?
Terminal - How to print orders?
Terminal - How to scan a barcode?
Storefront
How does it look like for my guests?
How to access the storefront/guest view?
How to register a user?
3rd Party Integrations
How to add an order button on Facebook?
How to disable other food ordering providers on Google?
How to integrate DISH Order to the Google entry of my restaurant?
How to link DISH Order with the Instagram account of the restaurant?
How to select DISH Order as your preferred food ordering provider on Google?
FAQs
Documents & Tools
DISH Reservation
Onboarding
FAQs
General / How to use
How do I create an offer to be displayed on my reservation widget?
How do I edit or add opening hours?
How do I edit or add tables in my table plan?
How do I export data from DISH Reservation?
How do I integrate the reservation tool into Google Business? [PREMIUM]
How do I login in DISH Reservation?
How do I manage the amount of online reservations I receive?
How do I reply to customer feedback?
How do I set a booking limit?
How do I set up and use service hours?
How do I use internal notes in the reservation tools?
How to access DISH Reservation through a mobile device?
How to activate the Push-Notification function?
How to add walk-in guests in DISH Reservation?
How to adjust the reservation status?
How to change the table booking priority?
How to change your password in DISH Reservation?
How to configure table groups?
How to create a PDF file of my reservations?
Admin panel
How to Manage Reservations in DISH Reservation?
How to add a Special Menu?
How to add a daily menu?
How to add a fixed menu?
How to add a time menu?
How to manage all account-related information?
How to manage all reservations settings?
How to manage reservations on the table plan?
How to manage the guest database?
How to manage users who will receive notifications?
How to set up the reservations (seat-based or table-based)?
How to view and publish guests feedback?
Overview of the Reports
Connecting Facebook/Instagram
Facebook/Instagram reservation button information
DISH Reservation - How to activate Reserve with Facebook and Reserve with Instagram?
How do I activate Reserve with Facebook and Reserve with Instagram?
I activated Reserve with Instagram but can't see the "Reserve Button" on my Instagram Business Profile.
I cancelled my subscription, but the Facebook button still appears on my Facebook and Instagram page. How do I deactivate this?
I cannot select the Facebook Page I want to connect to, as I am told it is "not eligible". How can I fix this?
I can’t activate Reserve with Facebook or Instagram, because it says “Your account is restricted at the moment”. How can I fix this?
I only want to activate "Reserve with Instagram". Is this possible?
I successfully activated Reserve with Facebook. I want to now activate Reserve with Instagram, but I can't find the "Activate Now" button to start the activation process on DISH Reservation.
My Instagram page doesn't show up in the list of Instagram profiles when trying to link Instagram to Facebook. How can I fix this?
The connection shows to be successful, but still the widget is not working. What can I do?
How do I add a reservation link to my Facebook and Instagram Page?
DISH Weblisting Premium
Tutorials
How do I publish a post?
How do I update my profile?
How to create a QR code?
How to purchase the tool?
How to reply to a review?
FAQs
DISH Weblisting
Tutorials
An overview of the general settings
How do I change my password in DISH Weblisting?
How do I connect my Google account?
How do I create my own QR code for my business?
How do I log in to DISH Weblisting?
How do I make the best use of DISH Weblisting?
How do I post content?
How do I reply to reviews?
How do I set up DISH Weblisting?
FAQs
DISH Website
Tutorials
Onboarding
How do I activate my DISH Website?
How do I add a description in the onboarding process?
How do I onboard a business on DISH Website?
How do I set opening hours in the website?
How do I set up a domain for DISH website?
How do I set up options and offerings on DISH Website?
How do I set up the imprint for my website?
How do I set up weblisting in the DISH Website onboarding?
How do I upload the menu on the website?
General / How to use
How do I access DISH Website through a mobile device?
How do I add a description to my website?
How do I add a food ordering service link?
How do I add an event to my website?
How do I add or change a menu on DISH Website?
How do I change the colour palette on DISH Website?
How do I link WhatsApp Click-to-Chat to DISH Website?
How do I link my social media platforms to my website?
How do I reorder the content on my DISH Website?
How do I use AI for my website description?
How to add the Google Analytics code to DISH Website?
How to create or edit my galleries?
How to set up a custom domain?
What the design templates of DISH Website (Professional) look like?
Admin panel
FAQs
Fiscalisation
Fiskaltrust
Cash Register Inspection
Cash Register Reporting with Fiskaltrust
Correcting an invitation to a non-existent eMail address
Fiskaltrust - Create CSV or XML report - Only for Germany 🇩🇪
Fiskaltrust - Create a DSFinV-K report - for Germany only 🇩🇪
Fiskaltrust All System Control
Fiskaltrust Docs
How do I cancel a subscription?
Replace TSE, defect / stolen TSE [DE09]
TSE is inactive after first receipts [DE08]
When a client didn't receive an invitation
DATEV
efsta
How do I deactivate an EFT after the client has stopped using the POS?
Why am I not receiving a confirmation of my electronic invoice?
ticketBAI
How do I register a certificate in the TicketBAI Region? (Non-Qualified Certificate for Autonomous Individuals)
How do I register a device certificate with Izenpe?
How do I register a device in the Araba region?
How do I register a device in the Gipuzkoa region?
Editing Orders and Adjusting Prices
RT Fiscal Printer Support and Maintenance Guidelines for Customers in Italy
- All Categories
- Fiscalisation
- Fiskaltrust
- Cash Register Inspection
Cash Register Inspection
 Updated
by Joshua Detjen
Updated
by Joshua Detjen
In this tutorial, we will guide you through what to expect during a cash register inspection.
Step-by-step instructions
The inspector will identify themselves with a service ID or may perform an anonymous test purchase.
- The inspector has the right to check your POS, records, and documents within your business premises.
- You are allowed to involve your tax advisor, but the inspector is not required to wait for their arrival.
- You must assist the inspector as part of your duty to cooperate.
- If there is a valid suspicion, or you fail to cooperate, an external audit may be conducted. A written transition from cash register inspection to external audit is required.
- At the end of the inspection, you will receive a protocol summarizing the results.
Documents to have ready:
• Proof of purchase or contract for the TSE (technical security equipment).
• Complete procedural documentation.
• Records from the POS system (DSFinV-K and tar format).
• Unique identification for each cash register.
• Contact information for authorized persons, including your tax advisor and cash register provider.
Procedure with Fiskaltrust
In the following section, we will show you how to perform exports in the Fiskaltrust portal for inspections.
Steps:
- Log into the Fiskaltrust portal (or navigate to the customer account) on a computer.
- Go to Configuration → Queue:
- Identify the correct queue and click on the Export button.
- Set the Export Range (start and end dates as requested by the inspector).
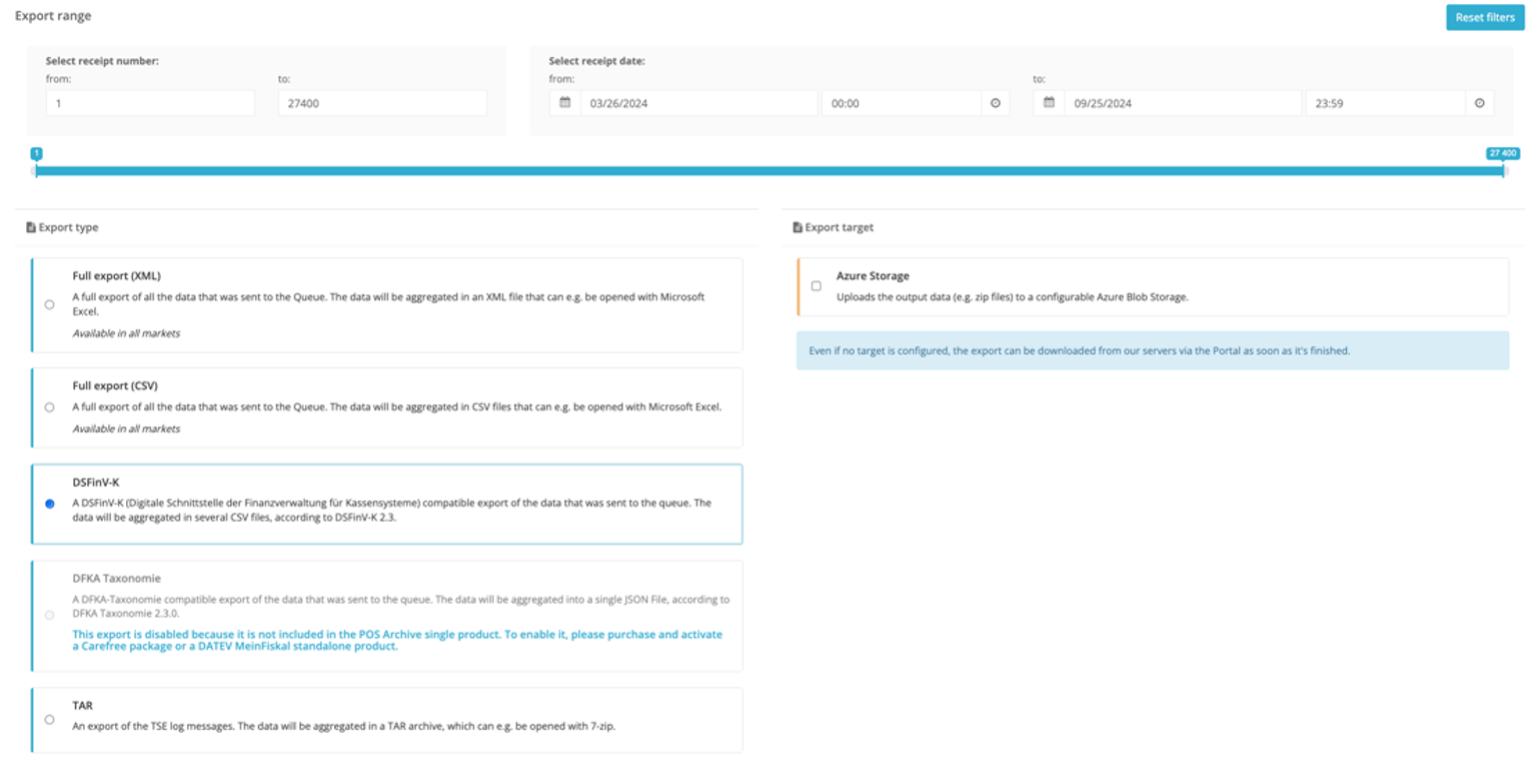
- Select DSFinV-K as the export format (no export target needed).
- Select DSFinV-K as the export format (no export target needed).
Click on Start Export.
- Go back to Configuration → Queue:
- Again, identify the correct queue and click the Export button.
- Set the Export Range, exactly as in step 2.
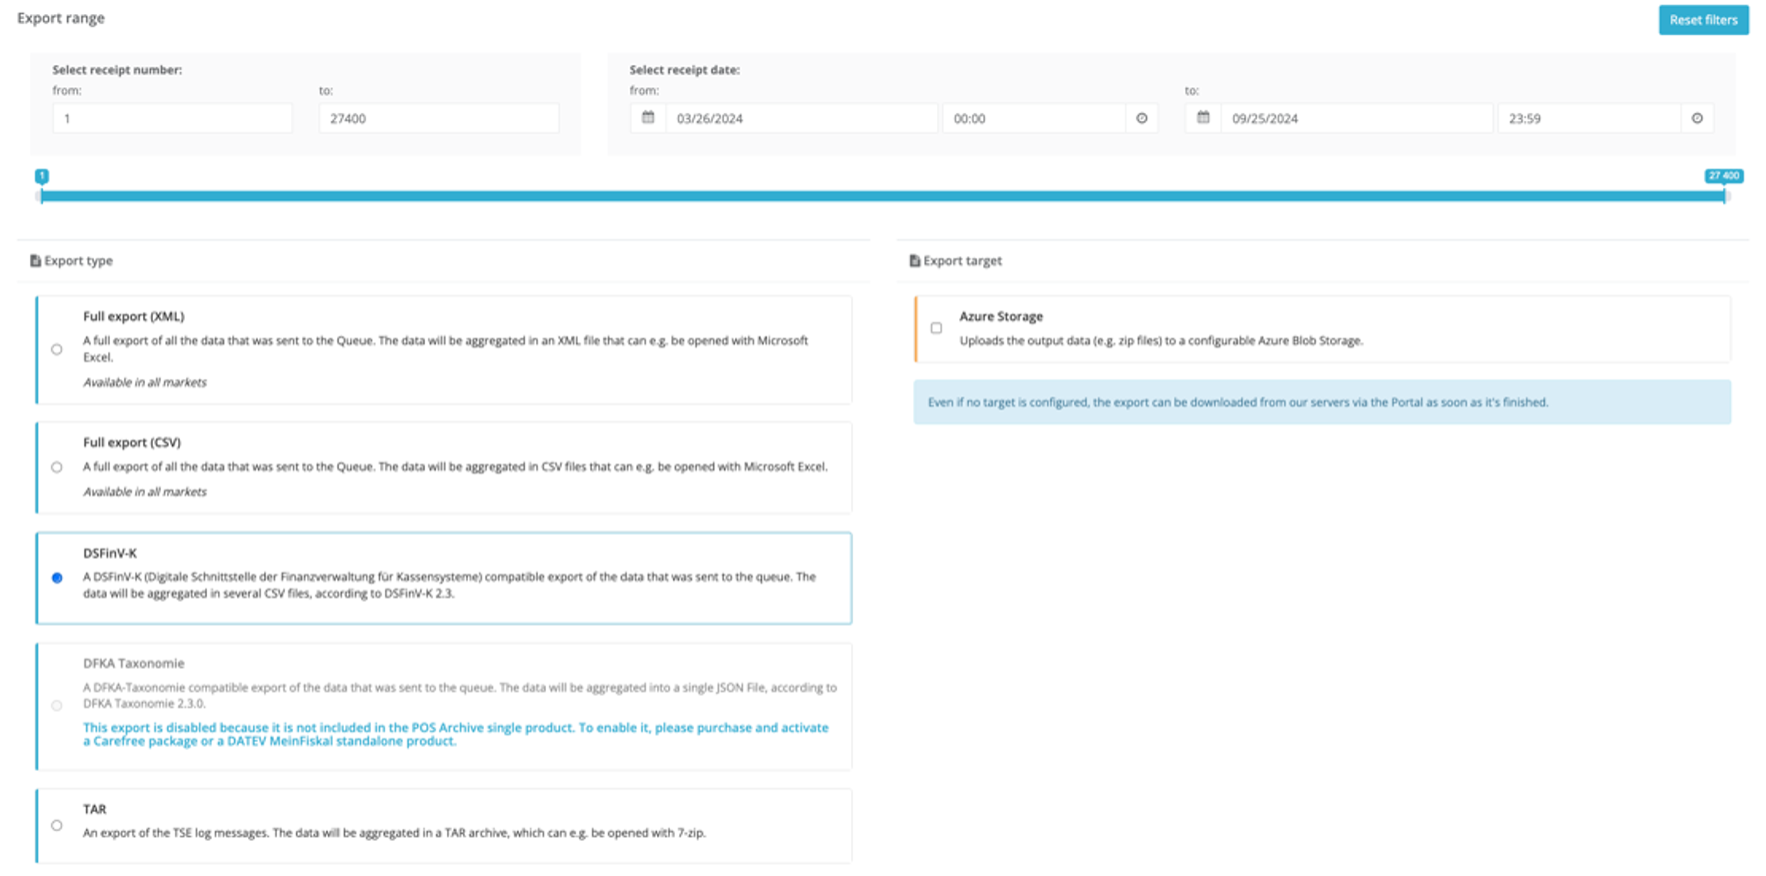
- Select tar as the export format (no export target needed).
- Click on Start Export.
- Navigate to Tools → Export.
- Wait for both exports to complete.
The status will change from In Progress to Complete.
- Click the arrow (>) next to the tar export to expand the row.
- Click on the row containing the zip file and download it.
- Click the arrow (>) next to the DSFinV-K export to expand the row.
- Click on the row containing the zip file and download it.
- Provide both zip files to the inspector (via email or USB stick).
We want your feedback
Your opinion is very important to us. Did you like this tutorial? Was it helpful? Rate it using the emojis down below.